The Ultimate Guide: How to Clean Makeup Sponges for Flawless Application
There’s nothing more satisfying than a flawless makeup application that you can achieve using your most loved makeup sponge. The smooth, airbrushed look is unbeatable. When was the last time that you did that trusted beauty tool an intensive scrub? If you’re like the majority of people, cleaning makeup sponges frequently gets pushed to the bottom of your list of self-care. Many don’t realize that this small mistake could be affecting your skin’s health and even the effectiveness of makeup.
In this complete guide, we’ll guide you through precisely what you need to do in order to cleanse makeup brushes efficiently, create an effective routine for cleaning makeup sponges and provide some of the most effective ways to prolong the life span of your makeup tools. No matter if you’re a novice in makeup or an experienced enthusiast learn how to keep your tools clean which provide flawless results each time.
Why Is Cleaning Your Makeup Sponge So Important?
Before we go into cleaning procedures, let’s consider the reasons why this practice should be given an ongoing place in your routine. The negative effects of makeup sponges that have been contaminated go far beyond a poor application.
The Bacterial Breeding Ground
Makeup sponges provide the ideal environment that allows bacteria to flourish. Take a look they’re designed to take in moisture and, after use, are usually stored in dark places such as drawers or makeup bags. The combination of dark and moisture provides an ideal environment for the growth of dangerous microorganisms .
The research uncovered some alarming information concerning the contaminated makeup tools. Research has revealed that 70% to 90% of cosmetics tested for contamination were found to be polluted and cosmetic blender-style foam makeup sponges proving to be the most contaminated . They are known to harbor harmful bacteria, including:
- S. aureus is the bacteria that causes staph-related infections, usually discovered on the skin in damp areas, with dark spots
- E. Coli: Usually associated with food poisoning, and is often present in meats that are raw
- Citrobacter freundii The bacteria found in feces of animals and humans matter
Impact on Skin Health and Makeup Application
If you’re using a dirty sponge, you’re spreading bacteria directly onto the skin. This can cause various skin problems, such as acne as well as irritation, contact dermatitis or even infection . A Holistic dermatologist Dr. Keira Barr explains, “Your natural oils, bacteria, makeup, dead skin cells, dirt, and grime accumulate on the brush, and then you are just reapplying that on a daily basis. This can lead to a lot of skin issues” .
Beyond skin issues The dirty sponges affect the makeup effects. The buildup of makeup can alter the shape and texture of the sponge which makes it less effective in mixing. The buildup can also affect the hue of your makeup as your apply the product, particularly when you’re using several makeup products using similar sponges .
Table: Reasons to Clean Your Makeup Sponges Regularly
| Skin Health Benefits | Application Benefits |
|---|---|
| Reduces acne breakouts and pimples. | Ensures smooth blending |
| Helps prevent skin infections. | Maintains true color payoff |
| Relieves irritation and inflammation. | Protects the shape and texture of sponges |
| Reduces the exposure to harmful bacteria | It extends the life of your sponge |
How Often Should You Clean Makeup Sponges?
The right routine for cleaning your makeup sponge is essential to maintain both your makeup tools and skin’s health. The ideal frequency of cleaning depends on how frequently you utilize your sponges, experts offer specific guidelines.
Expert Recommendations
In a perfect scenario, makeup artists would recommend washing your makeup sponge at the end of each use . Rea Ann Silva the founder of Beauty blender is adamant: “I highly recommend cleaning your sponge daily. With daily use, any makeup tool can accumulate dead skin cells, dirt, oil, pollution and bacteria. So just like washing your face or brushing your teeth every day, this will help keep your makeup tools in tiptop shape” .
While acknowledging that cleaning your sponges every day isn’t suitable for everyone, many dermatologists and experts in beauty suggest the following guidelines: clean your sponges every seven to ten days, using them regularly . If you’re unable to do it after each use, makeup expert Jenny Patinkin recommends three to four times is sufficient and should be done “at least once a week!”.
When to Clean Between Regular Schedules
Certain situations require urgent cleaning regardless of your normal timetable. Make sure you clean your sponge regularly:
- If it falls accidentally onto the floor
- In the event that you observe any changes in its texture or squish factor, you should inform us immediately.
- If you notice any odd or unusual odor, please let us know.
- If you’ve taken it while experiencing a skin infection, or breakout
- If you’ve shared it with someone else, you’re not alone.
Table: Makeup Sponge Cleaning Frequency Guidelines
| Usage Frequency | Recommended Cleaning Schedule |
|---|---|
| Daily use | After each use, or at a minimum 3-4 times each week. |
| Many times per week | Every 7-10 days |
| Occasional use | Each time you use it, If it’s been stored |
| Following skin infections or illness | Instantly and completely |
How to Clean Makeup Sponges: Step-by-Step Methods
Let’s get to the practical aspect Let’s look at the most effective ways to how to clean sponges for makeup. These methods will assist you to get rid of buildup, remove bacteria, and clean your equipment for maximum performance.
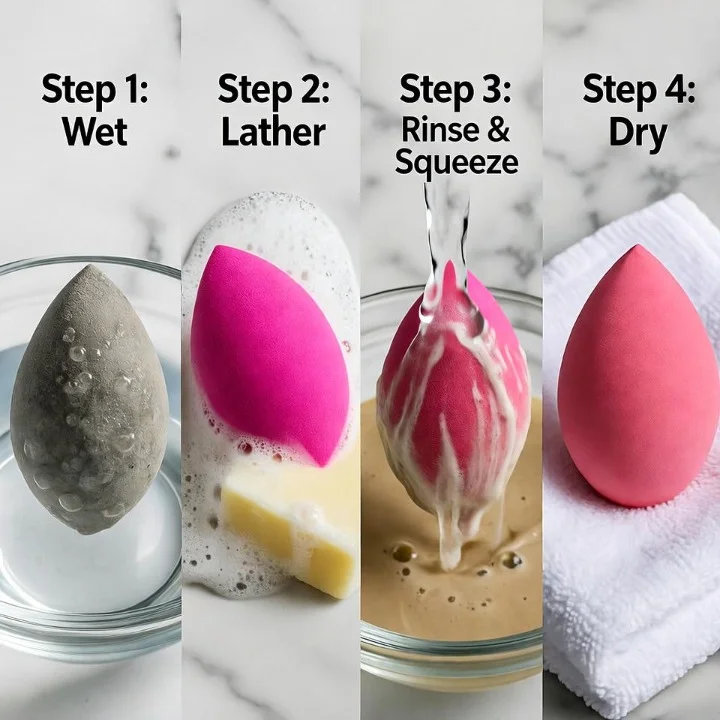
Method 1, Manual Cleaning using Water and soap
This is the most popular and easily accessible method to clean makeup sponges. It doesn’t require any special equipment, just an easy cleanser and a bit of patience.
Step 1: Wet the Sponge
Hold your sponge under lukewarm running water. Be careful not to use hot water since it may cause damage to the sponge’s material in time . Continue to wet and squeeze your sponge till it’s completely saturated.
Step 2: Apply Cleanser
You can add a small amount your cleanser of choice directly to the sponge that is wet. There are a variety of effective choices:
- Cleanser for makeup tools specifically designed for sponges
- Gentle liquid soap like castile soap
- mild dishwashing soap (sparingly because it is difficult to wash completely)
- Shampoo for babies
- Cleanser for the face (if you aren’t afraid of “wasting” it on your sponge)
Begin with a dime-sized amount, but you can always increase it if required. It can be difficult to get rid of from the makeup sponge .
Step 3: Lather and Massage
The cleanser should be gently incorporated into the sponge, massaging it with your fingertips. Concentrate on areas with stains by pressing and kneading your sponge to allow the cleanser to be absorbed into the substance. Keep going for a minimum of 15 minutes per sponge to ensure complete cleansing .
Step 4: Rinse Thoroughly
The most important step. Place the sponge in the running water in a lukewarm state and continue squeeze until the water is entirely clean. Be patient, this can take several minutes. “If you don’t fully rinse, your sponge can get kind of hard and dense,” Patinkin warns . Avoid twisting the sponge because this can damage the structure .
Step 5: Check for Cleanliness
After you rinse the sponge, squeeze it repeatedly. If the water is clean and clear of makeup The sponge’s clean. If you can still notice the water is tinted, continue the lathering and rinsing procedure. Be aware that some staining may be left on the sponge and that’s normal. As so long as your water flows clear when you rinse it off, the sponge is clean .
Method 2: Using a Silicone Cleaning Pad
If you’re looking for to get a deeper clean, makeup sponge cleansing pads can help with the cleansing process. These silicone tools have the appearance of nodules, textures, and spikes to help push to penetrate the cleanser inside the fabric.
How to Use a Cleaning Pad:
- Make sure you apply soap to your sponge according to Method 1.
- Make gentle circular motions, rubbing it against the surface of the cleaning pad.
- Be sure to work on both edges of the sponge for complete cleaning
- Rinse thoroughly following the instructions above.
Notification: Be careful with the pressure you apply to these pads as they may scratch the delicate surface the sponge if applied too vigorously .
Choosing the Best Cleaner for Makeup Sponges
There are a variety of cleaners for your makeup tool however, not all are to be the same. Let’s review the different kinds of cleaners so that you can choose one that is best cleanser for sponges used in makeup to meet your needs.
Dedicated Makeup Sponge Cleansers
Particularly designed to be used as products for makeup, the items are made to efficiently take off makeup and are soft on sponges. The most popular options are:
- Beautyblender’s Blendercleanser (available in both solid and liquid versions) effectively cleanses without damaging sponges. However, some users may find it difficult to get rid of the foundation’s residue completely.
- Jane Iredale Botanical Cleaner makes use of both witch hazel and alcohol in order to remove makeup, dirt, and oil
- Cleansing Brush along with Sponge Shampoo provides an affordable, unscented choice that makes tools soft and unharmed
Household Alternatives
There is no need for special items to wash your sponges efficiently. A variety of household items are effective:
- The liquid castile soap (like the Dr. Bronner’s) effectively eliminates oil from the skin and makeup
- Dish soap that is mild can help break down makeup, although it could require extra washing
- Shampoo for babies has a gentle scent and is efficient for sponges that have been lightly soiled
- Cleanser for the face is effective, although it can be a costly alternative for tools to clean
What to Avoid
Some cleaning products could harm your sponges, or create harmful residues
- Strong detergents that contain strong foaming agents may be difficult to completely rinse
- The bar soap could leave a residue, and shouldn’t be used to clean sponges.
- The use of bleach or harsh cleaning agents will degrade the sponge material
- Products that contain sodium lauryl Sulfates could cause damage to sponge and affect the surroundings
Table: Makeup Sponge Cleaner Comparison
| Cleaner Type | Pros | Cons | Best For |
|---|---|---|---|
| Dedicated Makeup Cleansers | Specifically designed for tools powerful removal | Costlier than alternatives | Regular users, as well as those who have sensitive skin |
| Liquid Castile Soap | Simple, effective, and easy to wash | Might require multiple passes to complete massive buildup | Green-conscious consumers, daily cleaning |
| Mild Dish Soap | Available that cuts through oils | It is difficult to wash completely and may cause dry sponge | Periodic cleaning, significant product buildup |
| Baby Shampoo | A delicate, pleasant scent | It is not recommended to tackle stains that are stubborn. | Baby shampoo that is spare and sponges that have been lightly soiled |
How to Dry and Store Makeup Sponges Properly
Drying and storage is equally important as proper cleaning for maintaining clean makeup sponges. Implementing the right ways to store makeup sponges methods will prolong their life span and stop the regrowth of bacteria.
Drying Techniques
After washing your sponge It is crucial to dry it properly to stop mold and mildew development.
- Get rid of excess water Use a gentle squeeze of the sponge using an untidy paper or towel towel to absorb as much water as you can. Some experts suggest wrapping the sponge in a hand towel and pressing it .
- Let the air dry naturally Place the sponge in an air-conditioned space and let it dry completely. It can take anything from a few hours up to an entire day, based on the conditions in which you live .
- Utilize dry racks Consider a specially-designed rack or holder that permits air to circulate throughout the sponge .
What to Avoid During Drying:
- Do not use a hair dryer or any other source of heat in order to accelerate drying since heat can harm the hair’s fibers
- Do not place sponges inside dryers for clothes.
- Beware of drying in enclosed containers or drawers in which air can’t circulate
Storage Solutions
After drying the proper storage method ensures that your sponges are fresh until the next time they are used.
- Containers that can be opened such as mesh organizers or dedicated sponge holders that allow for air circulation
- Egg cartons that are clean (paper ones work great) are ideal for separate compartments for sponge storage
- Vertical shelves on your vanity will keep sponges dry and accessible
- Makeup bags that are well-ventilated for those who require accessibility
Make sure to store makeup sponges only in plastic bags or containers that are airtight when they are damp since this promotes the growth of mold and spores . According to Silva suggests, “After washing or using your sponge, you always want to make sure you let it air dry in an open space. Never simply toss it back into a makeup bag” .
When to Replace Your Makeup Sponges
Even with the best clean-up and proper storage practices, cosmetic sponges won’t last for a long time. Deciding when to remove your tools is crucial for the application’s quality as well as overall health of your skin.
Replacement Timeline
Many experts are in agreement that makeup sponges must replace at least every 3 months and used regularly . For those who use them daily, they may require additional frequent replacements, however, sponges that are used frequently may last a bit longer.
The lesser life-span of sponges as compared to brushes is due to the fact that they are porous. Beauty blenders hold more bacteria and product than brushes, making them more difficult to keep free of dirt and causing them to lose their shape more quickly .
Signs It’s Time for a New Sponge
Look out for these indicators to tell you that your sponge is at the point of no return:
- Visible deterioration: Tears, rips, or pieces breaking off
- Texture change The sponge may feel heavier or less springy when it is new
- Loss of form It never can be restored to its original form after squeeze
- Persistent stain: Stains that are deep and aren’t faded by cleaning
- A sour odor: Even after the thorough cleansing, it can develop an unpleasant lingering smell
- Issues with the application There is no longer a way to blends makeup as effectively.
If you spot any signs of growing mold (often appearing as green or black spots) take the sponge off immediately as it is impossible for mold to be removed completely from these porous substances .
Expert Tips and Common Mistakes
Pro Tips for Cleaner Sponges
- Create a Rotation System: Having several sponges rotating ensures that you always have a fresh one to use while other sponges are drying. Makeup artist Tim Casper suggests this approach for a consistent supply of clean, dry brushes .
- Wash Your Hands Before Applying Makeup Always begin with clean hands prior to applying your makeup, to prevent the transfer of bacteria onto your sponge .
- address Stubborn Stains To remove staining that is persistent soak your sponge in warm soapy water for approximately 10 minutes prior to following the normal cleaning procedures .
- Use antimicrobial sponges When you purchase new sponges, look into alternatives made of antimicrobial foams to prevent the buildup of bacteria .
Common Mistakes to Avoid
- Microwave Cleansing Hacks In spite of the viral internet trends, don’t microwave your sponges. Rea Ann Silva advises “The first time I tried this, I set my blender on fire. So I don’t recommend it” . Furthermore, Patinkin notes that many sponges are treated with fire inhibitors, which means that microwaving could alter their chemical composition .
- Utilizing harmful Cleaners Bar soaps, detergents that are strong bleach, harsh cleaning agents could harm the sponge’s material and make it difficult to wash completely .
- Unsatisfactory Rinsing Inability to clean all soap residue off the sponge could cause it to harden and become dense, which can affect its performance .
- Unproper drying: Storing the sponges still damp promotes the growth of bacterial and mold .
Conclusion
The art of learning the best ways to wash makeup sponges correctly is a crucial knowledge for anyone using makeup. If you follow the tips and routines described in this article and you’ll not only prolong the life of your makeup tools, but also safeguard your skin’s health and ensure flawless application each time.
Keep in mind that a clean, fresh sponge is essential to gorgeous makeup and a healthy complexion. Setting up a regular routine for cleaning your makeup sponge and using the right techniques and replacing the sponges on a regular basis will change your beauty routine.
Frequently Asked Questions
What can I do to remove the stubborn stain off my sponge for makeup?
There are instances of staining that are common, particularly when you use of products with pigments. To get rid of stains on your makeup sponge Try soaking the sponge in a solution of cleansers and warm water for about 10 minutes prior to following the usual cleaning procedure. But, keep in mind that when the water flows clear when washing, your sponge is clean. Surface stains don’t necessarily mean that it’s dirty .
Do I have to use the microwave to disinfect my sponge for makeup?
The majority of experts advise not to microwavable makeup sponges. This can cause damage to the sponge as well as modify its chemical structure and may even lead to fire dangers .
What’s the best method of storing makeup sponges for travel?
Make sure your container is well ventilated and lets air circulate. There are travel cases that feature design that is breathable and you could also use an empty egg carton with a clean compartment. Make sure the sponge is dry before putting it in the case .
How do I know whether my sponge is free of dirt?
Your sponge is clean if the water is completely clear when you rinse it off, and there is no soap or makeup suds. Furthermore, it should not make any marks when it is squeezed on the white paper towel .
We’d like to hear from you about your sponge cleaning experience! Which method is best your needs? Send us your suggestions and concerns in the comments section below!